According to BuiltWith, WooCommerce is dominating the eCommerce industry with a usage distribution of 27%.
However, Google trends point out that Shopify is gaining more attention than WooCommerce in the last 12 months. This doesn’t knock your sock off as Shopify boasts many advantages over WooCommerce, including conversion-optimized themes and checkout.
That’s why more and more eCommerce site owners are re-platforming their WooCommerce stores to Shopify.
If you’re among those who are about to migrate WooCommerce to Shopify, this tutorial will be everything you need!
3 simple ways to migrate WooCommerce to Shopify as well as handy migration tips will be presented below!
WooCommerce to Shopify Migration Checklists
For a smooth migration, you should take these points into serious consideration:
- Back up your WooCommerce store database before migration. This will help you keep all the important data in case anything wrong happens during the migration process.
In your WordPress dashboard, go to Tools > Export.
Choose your desired content to export it to XML files.
Click “Download Export File” to download the XML files and save them.
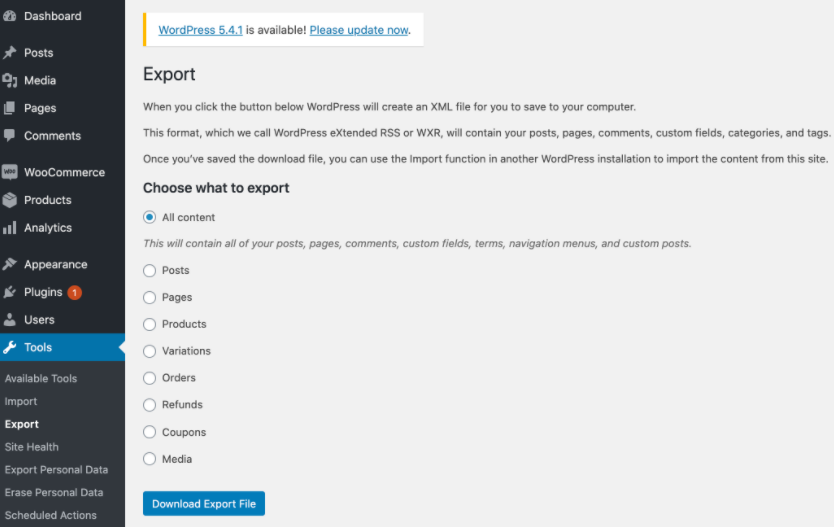
- Make sure you export product variants with your products. Remember to select products and product variants as XML files when exporting data. If not, you have to spend lots of time and effort recreating them on the new store.
- Set up 301 redirects to preserve SEO rankings. This is compulsory especially when you manually migrate WooCommerce to Shopify. By doing so, all the SEO efforts you’ve spent for years won’t go to waste.
- Don’t forget to migrate user passwords. Export user data helps save user account details and passwords. You don’t want to frustrate your customers by asking them to set new accounts and passwords all over again, do you?
Once you’ve taken notes of these points, keep reading to discover 3 simple ways to migrate WooCommerce to Shopify.
How to Migrate WooCommerce to Shopify
There are 3 common approaches to migrate WooCommerce to Shopify: migrate data manually, using migration tools, and hiring migration experts. We’ll walk you through them one by one in detail.
#1. Migrate WooCommerce to Shopify Manually
The advantage of this method is it’s quite straightforward and cost-saving. Follow 2 steps below to manually migrate WooCommerce to Shopify:
Step 1: Export Data From WooCommerce
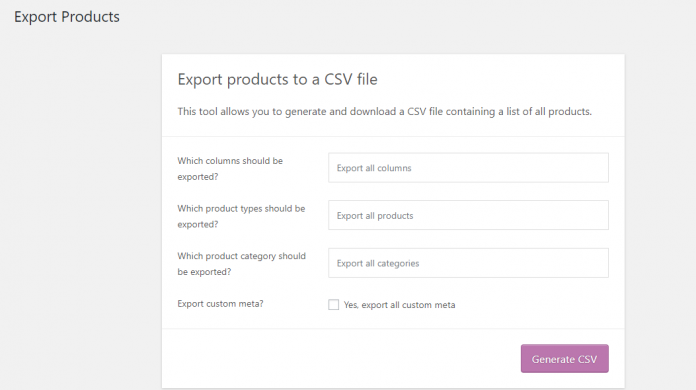
- In your WordPress dashboard, go to WooCommerce >Products > Export.
- Choose certain product types and categories that you want to migrate. Alternatively, leave these fields empty if you want to move all of your data.
- Click on the Generate CSV button.
Step 2: Import Products To Shopify
- In your Shopify admin panel, under the Products section, click All Products > Import.

- Upload the CSV file that you’ve just downloaded from WooCommerce and hit Start Import.
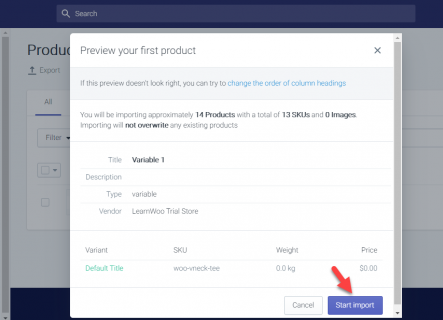
It takes the Shopify Importer a while to add products from the CSV file to your online store. Once done, all of your WooCommerce products will be listed on your Shopify store.
You can follow the same process for importing your customers and orders data.
Some Drawback of Manual Data Migration
- While manually importing products, product images won’t be included in the process. This means you need to add them later, which requires extra time and effort.
- For digital products, you might need to install a Shopify app supporting digital download features. This is because all digital products are marked “unpublished” in the CSV file.
- Bundled products in WooCommerce won’t be imported as “bundles.” Once switch to Shopify, you will have to manually build the bundled products all over again.
- The manual migration process will miss out on some products or customer data.
#2. Use Migration App
Using an import tool gives you full control over the WooCommerce to Shopify migration process. In return, it will cost you some money.
In this tutorial, we use Litextension. With a 4.7/5 overall rating, this all-in-one solution claims to help you migrate WooCommerce to Shopify automatically, accurately, and safely.
Before we dive into the details, make sure you have a LitExtension account. If not, go register here. Following are the 3 code-free steps to migrate WooCommerce to Shopify with Litextension.
Set Up WooCommerce as Your Source Cart
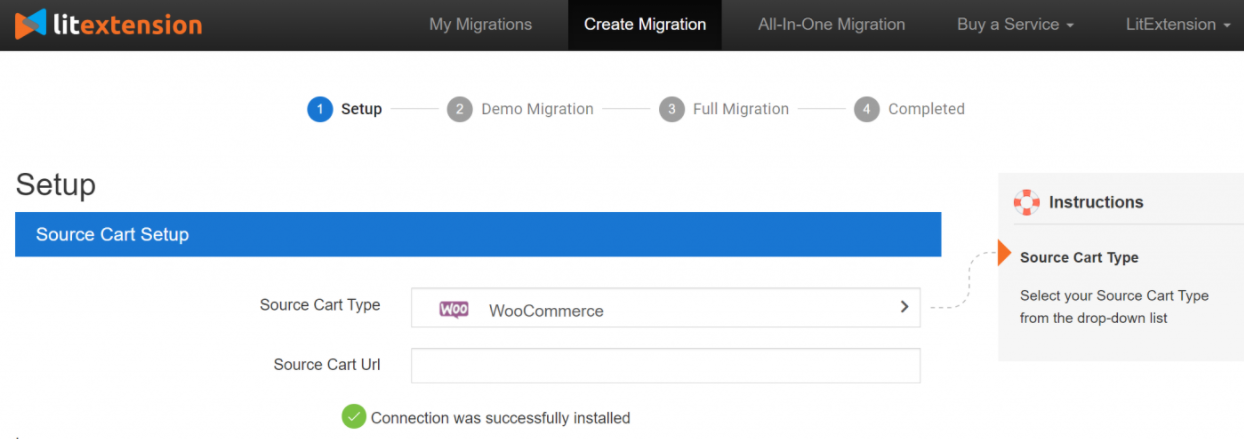
- Once you’ve logged into your LitExtension account, click “Create new migration.” A new screen displays letting you set up your Source and Target Cart.
- In the drop-down menu, select WooCommerce as your Source Cart. Input your store URL.
- Next, download the “le_connector” file under the zip file format based on the provided instruction. The file helps connect the WooCommerce database with the LitExtension App.
- Upload the Connector folder you’ve just downloaded to WooCommerce’s root folder on your server. A message of “Connection was successfully installed“ will show up once the upload process finishes.“
Set up Shopify as Your Target Cart
- Choose Shopify as your target cart from the dropdown.
- Enter your Shopify store URL
- Fill in the API password of your Shopify Store.
- Hit “Next: Configure your Migration” to move to the next stage
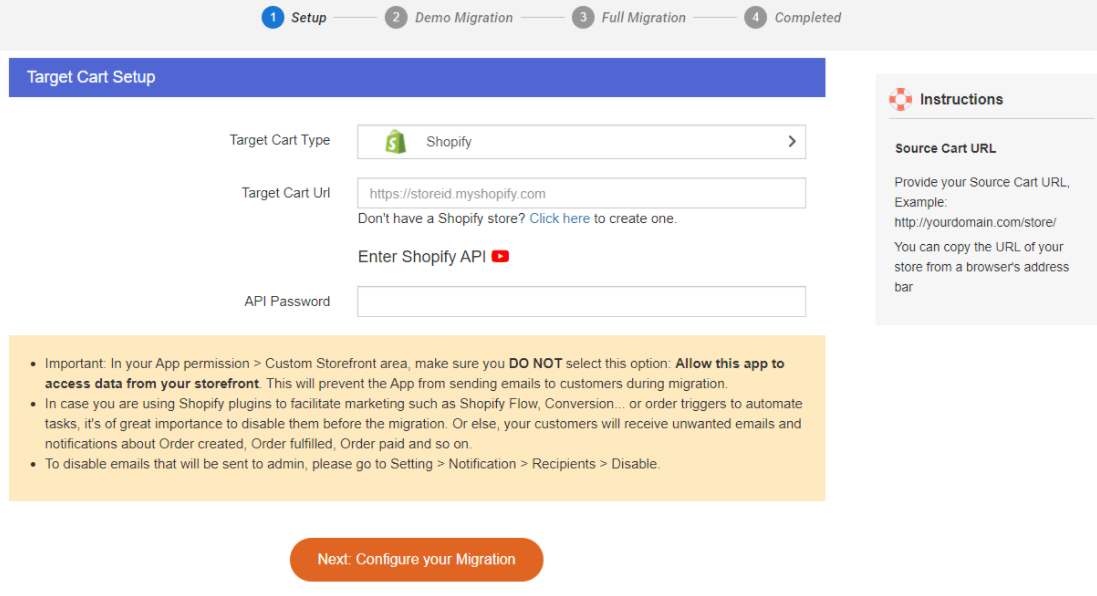
In case you don’t know how to get the Shopify API password, check out our guide on how to migrate Shopify to WooCommerce. The process of generating the API key is the same.
Configure Data to Migrate WooCommerce to Shopify
Litextension allows you to migrate products, customers, pages, blog posts, and coupons. Check on each option or click on “Select all” if you want to migrate all of them.
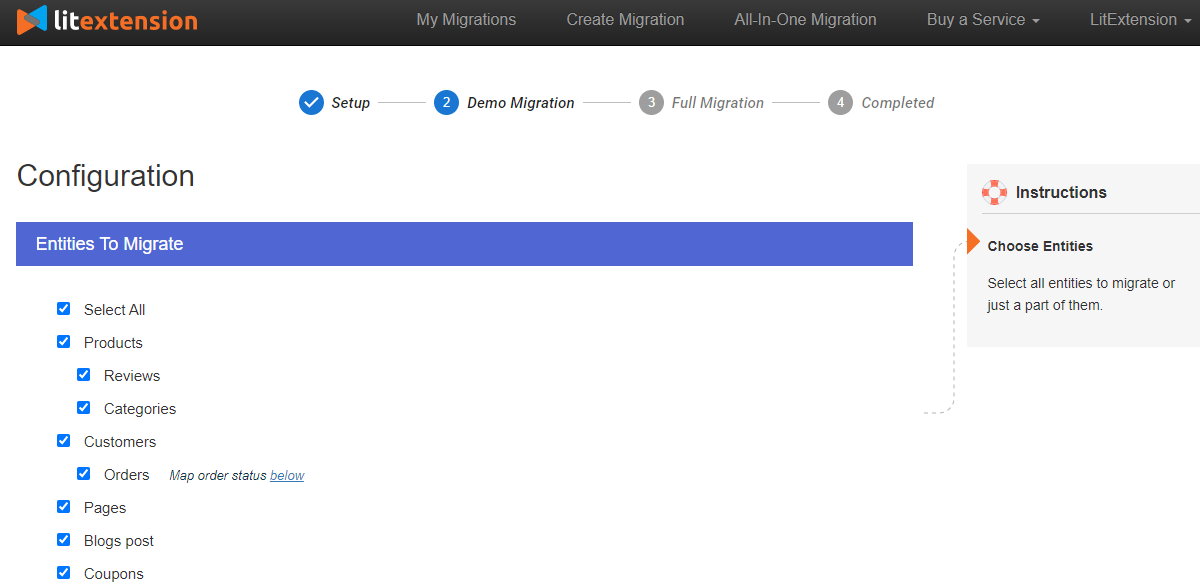
The tool also offers some additional options like:
- Clear current data on Target Store before Migration: remove existing data that you have chosen above on your Target Store (if you have any) to avoid data duplication.
- Create the 301 redirects on your Target Store after migration: All the URLs of your old WooCommerce store will be redirected to the corresponding pages on your new Shopify site.

Last but not least, you need to map your language and order status. This will ensure all of them will be correspondingly displayed on your new Shopify store.
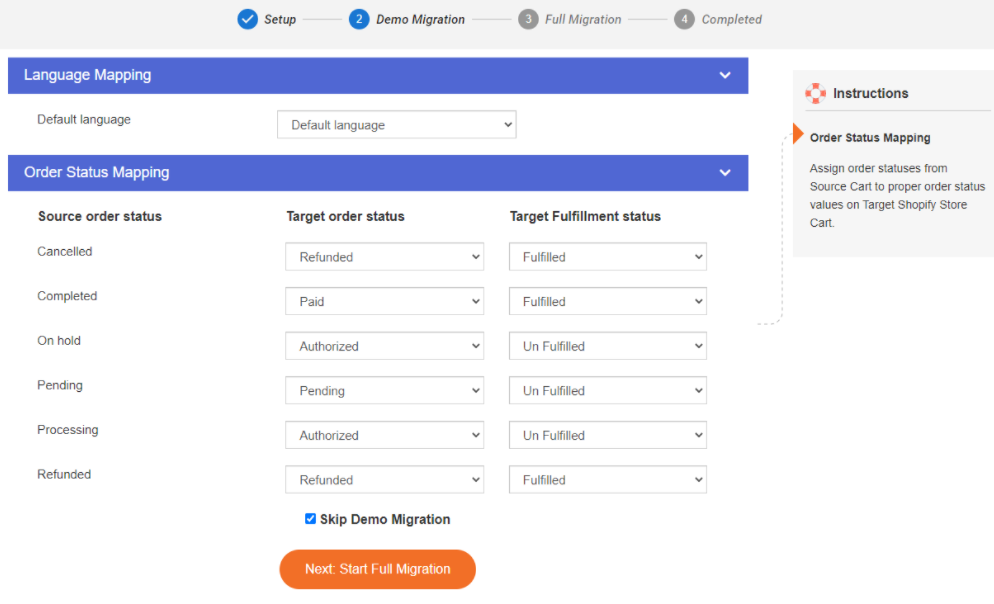
Now you are ready to run the migration. Click on “Next: Start Full Migration” to proceed to the next step.
Run Full Migration
We recommend you take the demo migration first to see how the tool works. After that, you can run the actual one.
The full migration will take place seamlessly on the server. That’s why you can even turn your PC off while transferring the data. The app will notify you via email as soon as the process completes.
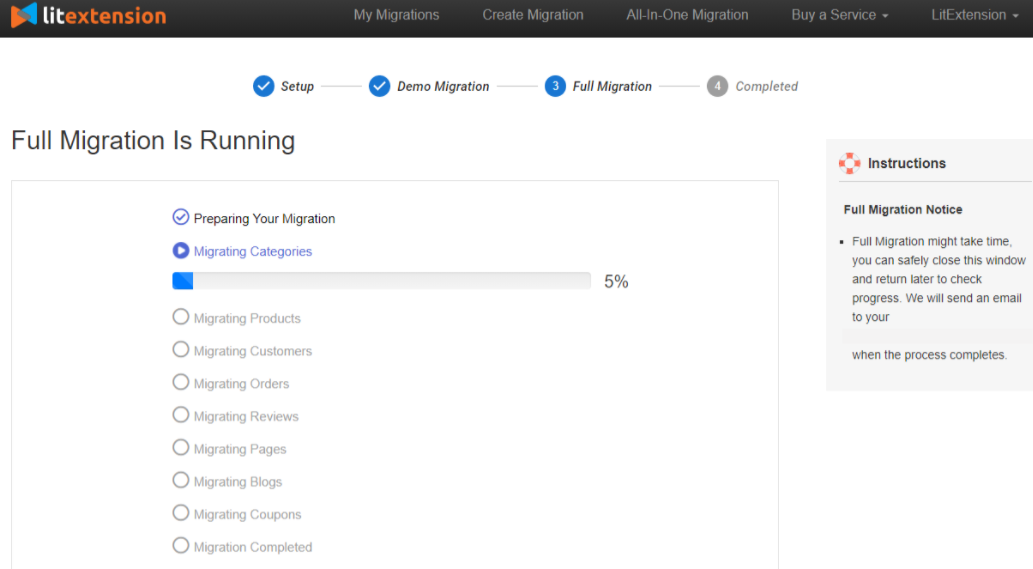
That’s it! The process of making the switch from WooCommerce to Shopify has come to an end.
#3. Hire Migration Experts
If you’re in the money and want a mind-free migration, let Shopify migration specialists take care of the job for you! This approach lets you migrate WooCommerce to Shopify safely without involving any back and forth.
Apart from exporting/importing your data, migration experts will help you set up SEO redirects, keep up your new store, and many more. Depending on your specific needs, their services will range from $500-$2000 per project.
Ready to Migrate WooCommerce to Shopify?
We’ve walked you through 3 simple ways to switch your WooCommerce store to Shopify. Depending on your budget, you can choose to manually migrate WooCommerce to Shopify, using a migration tool, or hiring Shopify migration experts.
We’ve also brought forward some migration checklists you should notice while importing/exporting migrated data.
If you have any questions or get stuck on any steps above, don’t hesitate to drop a line in the comment section to let us know.